
Administrator's Guide
Digital Q.BPM releases
Current versions of images:
- registry-new.diasoft.ru/release/qbpmui:24062802
- registry-new.diasoft.ru/release/qbpmdesigner:24080705
- registry-new.diasoft.ru/release/database-qbpmdesigner:24080705
- registry-new.diasoft.ru/release/qbpmcockpit:24071205
- registry-new.diasoft.ru/release/database-qbpmcockpit:24071205
- registry-new.diasoft.ru/release/dqhumantask:24101702
- registry-new.diasoft.ru/release/database-dqhumantask:24101702
- registry-new.diasoft.ru/release/humantaskui:24120402
- registry-new.diasoft.ru/release/qbpetqbpmplayer:24113001
- registry-new.diasoft.ru/release/database-qbpetqbpmplayer:24113001
Q.UN Releases User Notifications
Creating a Reference Database for the Project
Before creating the project, it is necessary to prepare a reference database for the project. To do this, determine the list of existing database schemas that will be used in the project.
List of modules and their databases:
- QBPD - Digital Q.BPM Business Process Designer: qbpmdesigner
- QC - Digital Q.BPM Cockpit: qbpmcockpit
- QHT - Digital Q.BPM Human Task: dqhumantask
- QBPET - Digital Q.BPM Player: qbpetqbpmplayer
- QAL - Digital Q.BPM Application List: qbpmapplist
Creating a Repository and Building a Microservice Based on Digital Q.BPM Player
To create application microservices based on Digital Q.BPM Player, the base image Digital Q.BPM Player must be used. The algorithm for creating a repository and building an application microservice is as follows:
-
For each deployed microservice based on Digital Q.BPM Player (hereinafter module), a separate repository must be created in GitLab.
The repository structure for the microservice should be as follows:
Project (main) /
├── Resources/
│   ├── Schemas/
│   │   └── Schema - .json file
│   ├── Process - .bpmn file
│   └── Diagram - .svg file
├── Docker/
│   ├── Dockerfile-database.txt
│   ├── Dockerfile-service.txt
│   └── properties.properties
├── pom.xml
└── ...- The module repository must contain a
mainproject directory (without Java code), adockerdirectory, and apom.xmlfile; - The
maindirectory must contain aresourcesdirectory, which should only hold resources (process + schema (object)). For storing schemas in theresourcesdirectory, a dedicatedschemasdirectory must be allocated. Storing schemas (objects) in a separate directory is necessary to ensure unambiguous identification of the business object required to run the module. Thus, the dynamic attributes library uniquely identifies the schema needed to start the module. In specific cases, the service may start without schemas; - The
dockerdirectory must containDockerfile-database.txtandDockerfile-service.txt- instructions for building the Digital Q.BPM Player Docker image; - The
Dockerfile-database.txtandDockerfile-service.txtfiles must specify the location of the repository where a specific version of the Digital Q.BPM Player image is stored, as well as the location of the.jar fileand thestartup parameters; - Further configuration of the Jenkins file is completely identical to the MSA configuration, and the release process is built in exactly the same way.
Updating the Digital Q.BPM Player Base Image
To update the base image of the player, follow these steps:
- Go to the player repository in the docker directory.
- In the
Dockerfile-database.txtandDockerfile-service.txtfiles, specify the current version of the image fromregistry-new.diasoft.ru/release.
- Commit the changes. The module will start building on the updated image.
- If the release version is specified in docker, just restart the build.
- Update the module on the stand.
The image versions in Dockerfile-database.txt and Dockerfile-service.txt must match.
Parameters related to Digital Q.BPM Player:
QBPM_PROCESS_INPUT_TOPICS- topics for subscription separated by semicolonsQBPM_PROCESS_OUTPUT_TOPICS- separated by semicolons, topics to which sending is allowed (Example: QBPM_PROCESS_OUTPUT_TOPICS = dsTaskCreateEvent;dsTaskCancelEvent;dsTaskActionEvent)QBPM_MODE- player mode RUN/DEV/PRODQBPM_DLQ_TOPICS- creating topics with dlq postfix (true - creation enabled; false - creation disabled)QBPM_LIMIT_DEFINITION_VERSIONS_ENABLED- auto-deletion of business processes - default false (true - auto-deletion is enabled; false - auto-deletion is disabled)QBPM_LIMIT_DEFINITION_VERSIONS_COUNT- number of saved processes (default 10)
When auto-deleting in the Business Process Designer, the diagram changes its status to archived. Associated processes are removed from Process Monitoring. If a process has active instances, the process is not deleted. Deletion occurs after publishing a new version.
Player Modes: RUN/DEV/PROD
Division of diagrams into areas/namespaces/profiles has been implemented in three operating modes (each mode has a corresponding tenantId parameter for diagrams):
- DEV - all diagram versions are marked with a special label. An active job is activated, which "cleans up" active processes - terminates (having the status "Externally Completed") all active process instances if they have been running for
more than 12 hours . Also, one day after the process instance has been executed, its history is cleared - entries in the qbpetqbpmplayer service table are deleted:act_hi_* - PROD - the default mode, the platform works as before. Diagrams are published, complete history is stored, etc.
- RUN - all versions of diagrams are marked with a special label. A job is activated, which “cleans” active processes - terminates (will have the “Externally Completed” status) all active process instances if they have been running
more than 5 minutes . The history is cleared - records in the qbpetqbpmplayer service table are deleted:act_hi_*
At the same time, Swagger controllers are also divided by profiles and do not intersect.
The player mode, QBPM_MODE configuration setting, is set manually via Kubernetes configs. This enhancement has several advantages and solves several problems:
- Conducting demonstrations and important presentations in PROD mode. Eliminates the need to demonstrate multiple versions used for debugging (clutter).
- In DEV mode, versions can be deleted as much as needed. PROD mode is for using the final, working, stable version of the diagram (without the ability to delete diagram versions).
- Reduces memory consumption by the service.
Additional features include the implementation of test diagram instance launch functionality. The Play button opens a modal window where input and output parameters are specified, after which the diagram instance can be launched. This mode allows debugging small "pieces" of a large diagram that are divided into subsets of diagrams. Thus, it allows finding and fixing all defects during design. During such a test instance launch, all active diagram instances will be terminated if they have been running for act_hi_*.
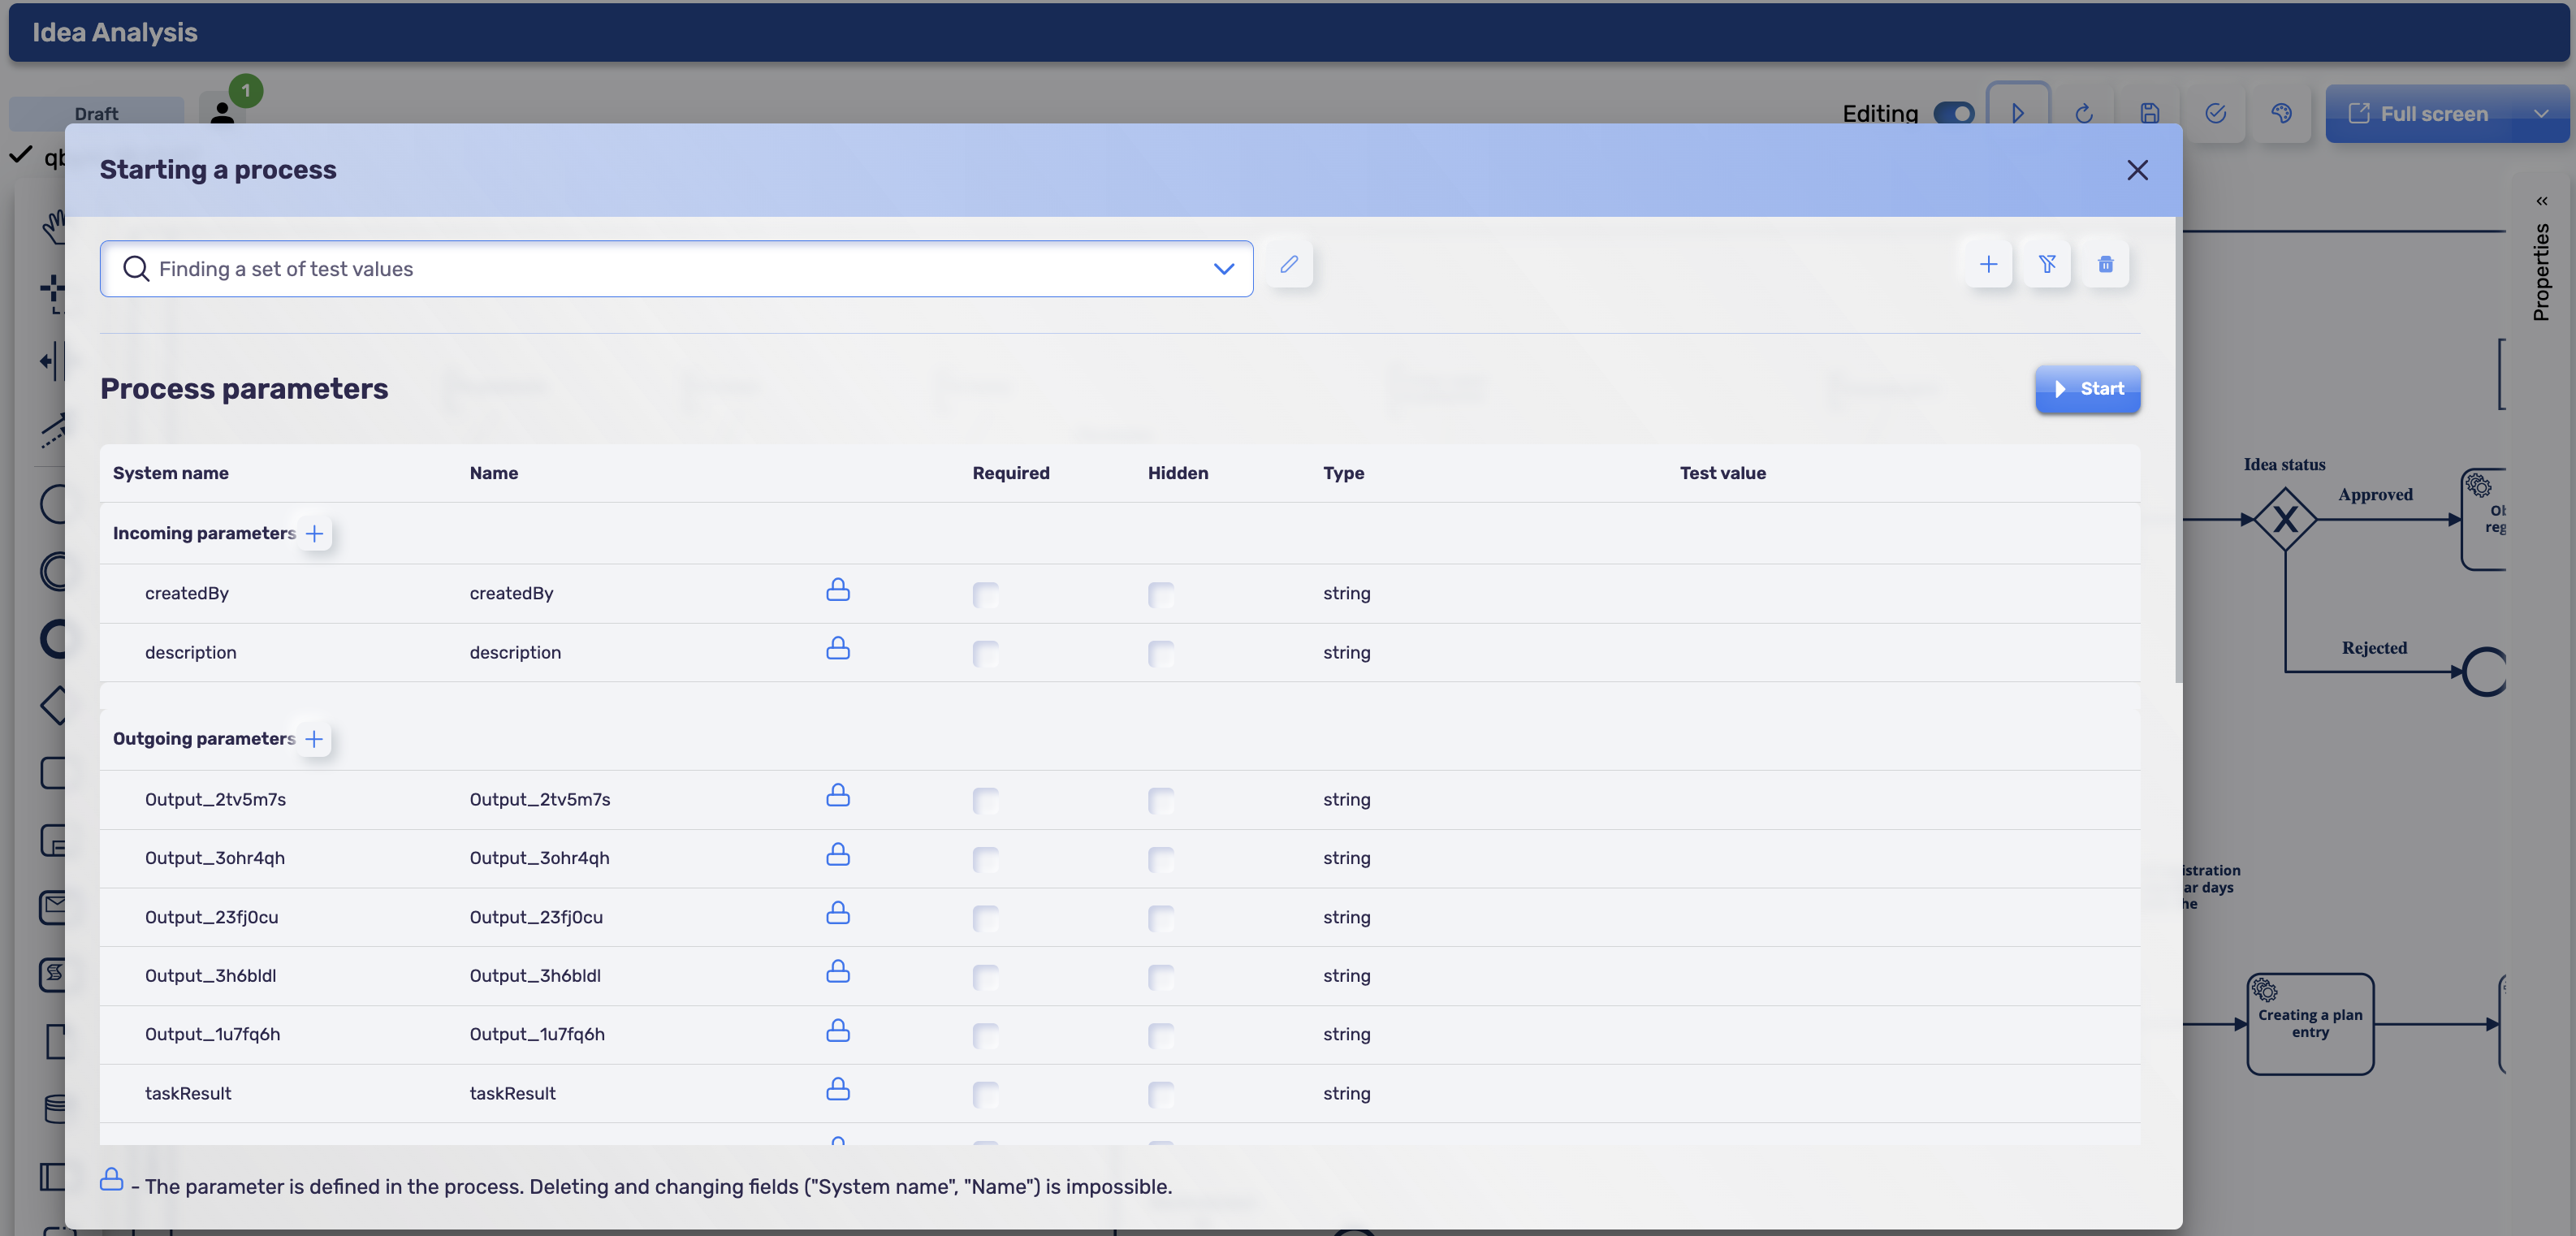
To perform a test launch of a process instance, fill in the "Test Value" column in the input parameters in the modal window.
Storing process execution history
To save memory in the database, you can configure clearing the history of executed processes. Number of days of storage of the execution history of processes registered in act_re_procdef.history_ttl_
You can set the value history_ttl_ - History Time To Live in several ways:
- You can completely disable history. In the Business Process Designer, in the process properties, enable the Do not store process execution history option. Pay attention to each process separately.

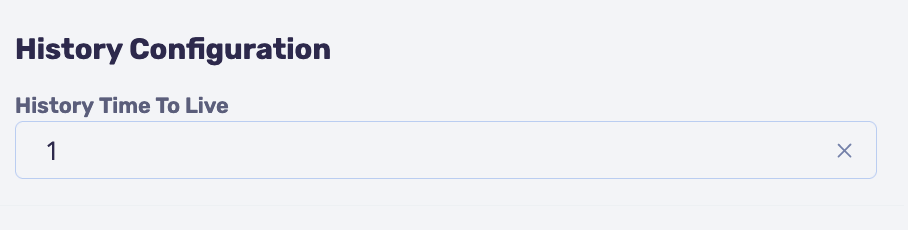
- Set the number of days to store history. In the Business Process Designer, in the process properties, set the value for the History Time To Live parameter. Configured separately for each process.
- Set the Digital Q.BPM Player operating mode via the
QBPM_MODEparameter - Add the
QBPM_HISTORY_TIME_TO_LIVEparameter to Business Process Monitoring (qbpmcockpit) and specify its value in days. (ExampleQBPM_HISTORY_TIME_TO_LIVE: P1D)
If the Digital Q.BPM Player does not have an operating mode set (QBPM_MODE=RUN/DEV/PROD), then the value for act_re_procdef.history_ttl_ will be set from qbpmcockpit in the QBPM_HISTORY_TIME_TO_LIVE parameter
Process execution history tables will not be cleared while the process is active.
Logging Capabilities and Levels
logging:
    config: classpath:log4j2.xml
level:
    root: ${LOGGING_ROOT_LEVEL:INFO} # Logging everything
    ru.diasoft.micro: ${LOGGING_DIASOFT_LEVEL:${LOGGING_ROOT_LEVEL:INFO}} # Logging Diasoft classes
    org.hibernate.type: ${LOGGING_HIBERNATE_LEVEL:INFO} # To log values set TRACE // Logging database queries
    org.apache.kafka.clients: ${LOGGING_KAFKA_LEVEL:INFO} # Logging Kafka client
    org.springframework.kafka.listener: ${LOGGING_KAFKA_LEVEL:INFO} # Logging listeners
    org.camunda.bpm.engine: ${LOGGING_CAMUNDA_LEVEL:INFO} # Logging all Camunda actions
    org.springframework.transaction: ${LOGGING_TRANSACTION_LEVEL:INFO} # Logging transactions
Logging should always be enabled. By default, logging is set to the ERROR level, and the use of all modules is allowed. For the PROD mode, it is recommended to set the level to ERROR and only for the necessary module. For the DEV or RUN mode, it is recommended to set the level to ALL for the "root" module.
Available logging levels:
INFO- only informative messages and what is logged in the code with the INFO level;ERROR- information about all errors is output;WARN- information about various warnings;ALL- the maximum level that outputs absolutely everything;DEBUG- debug mode.
In DEBUG mode, the service consumes a large amount of resources
Digital Q.BPM Installation Guide
Configuring services
-
Digital Q.BPM UI (Root Application)
- QBPM UI Settings (Standard authentication mdpauth)
Example configuration file content- QBPM UI Settings (Keycloak authentication)
Example configuration file content -
QBPD - Business Process Designer
qbpmdesigner.properties -
QC - Cockpit
qbpmcockpit.properties -
QHT - Human Task backend
dqhumantask.properties -
QHT - Human Task
humantaskui.properties -
QBPET - Digital Q.BPM Player
qbpetqbpmplayer.properties
For Digital Q.BPM services to work, it is necessary to install up-to-date platform services.
- mdpauth
- mdpdepartments
- mdpemployee
- mdpgateway
- mdprefs
- mdproles
- mdpsenders
- mdpsettings
- mdpusers
Request current versions of platform services from the "Tools and Back-end Development Platform" team
authentication setting
License Configuration
After March 10, 2023, license verification is enabled in Digital Q.BPM services.
To obtain a license, you must send a request to «CTL - incoming requests ctl@diasoft.ru»
Modules that must be specified in the license:
- QBPD - Business Process Designer: qbpmdesigner
- QC - Cockpit: qbpmcockpit
- QHT - Human Task: dqhumantask
- QBPET - Digital Q.BPM Player: qbpetqbpmplayer
Setting up in namespace via Kubernetes
- Open Kubernetes, Config Maps section
- Find the configuration named share-config-volume
- Open for editing

- Find the license.xml parameter in the data block:
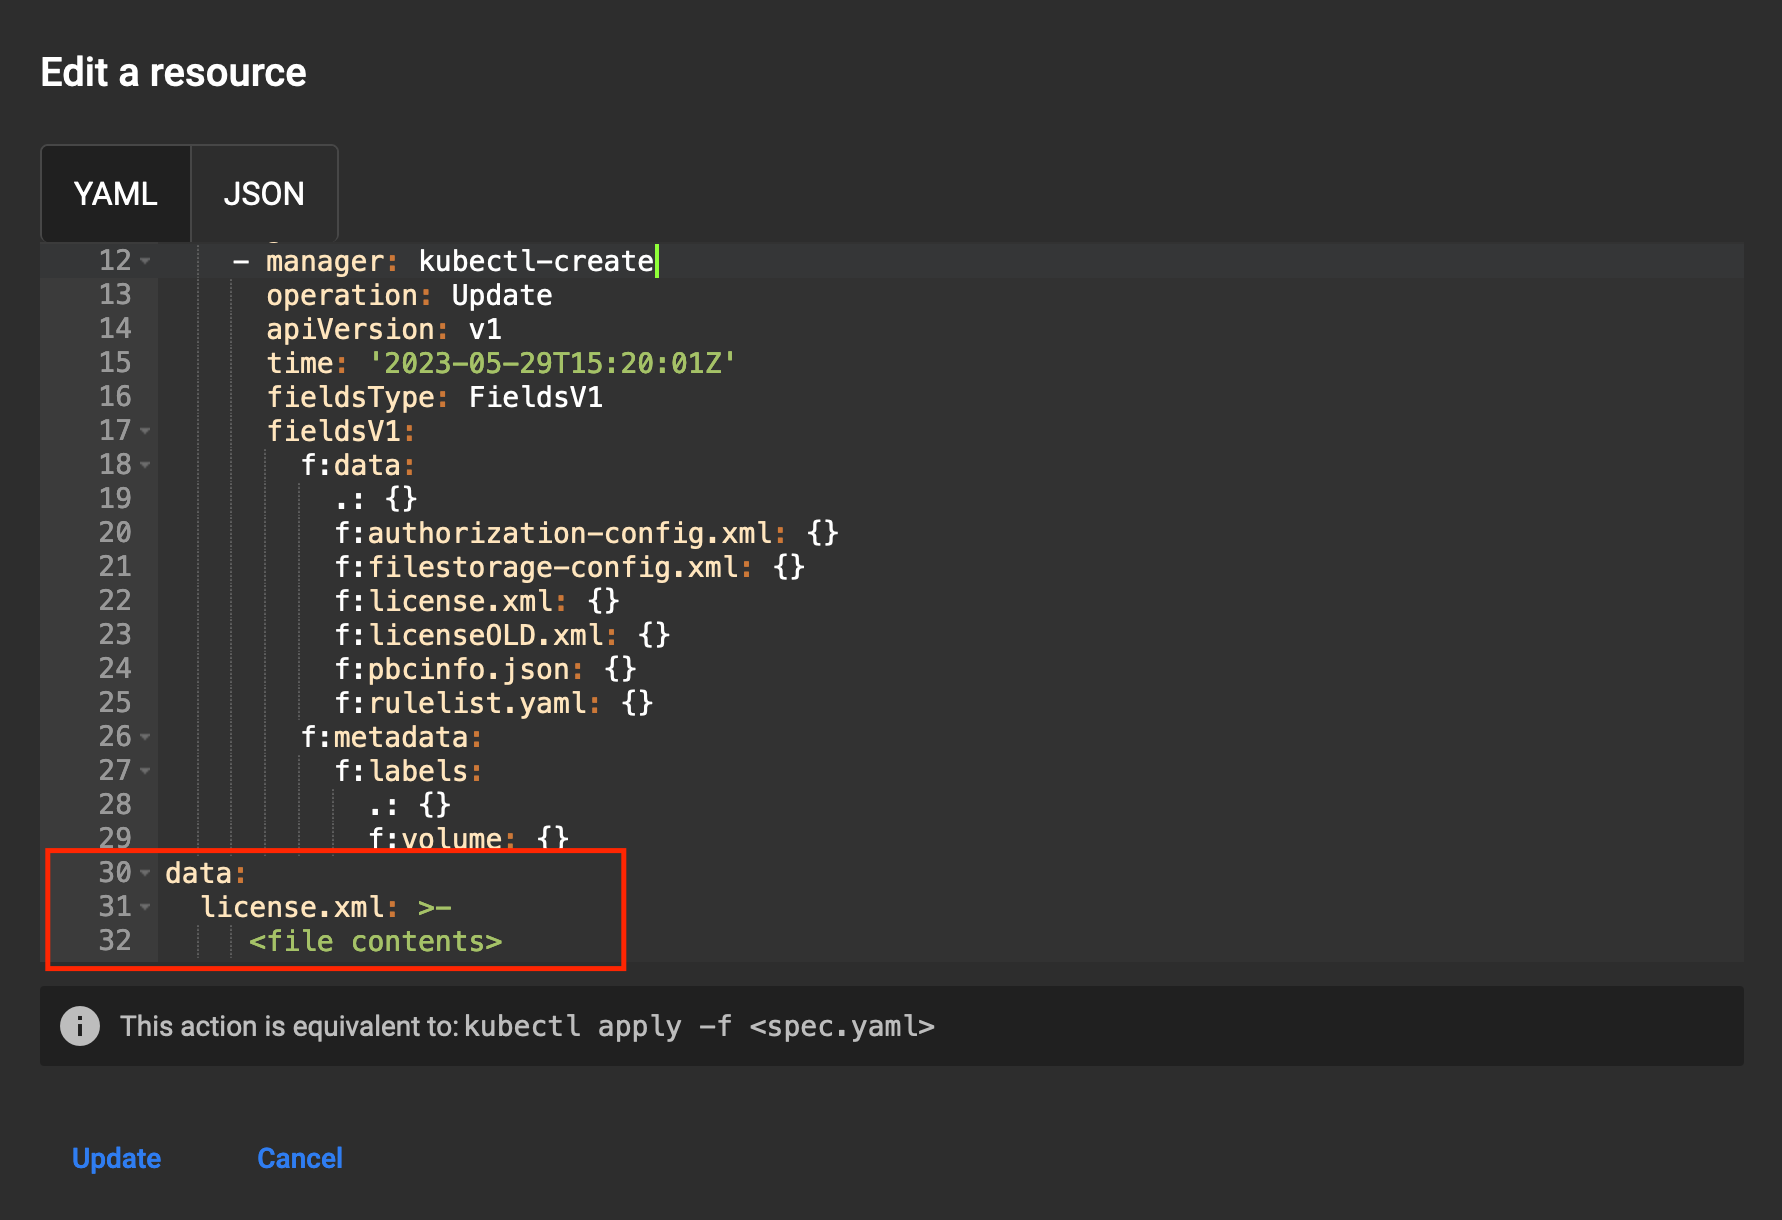
- If this parameter is missing, add a parameter called license.xml
- Add the entire contents of the received license.xml file to the parameter value
- Save the configuration share-config-volume using the Update button
- In system-config or in the service configuration, add the LPATH parameter: /share/config/
- Check the value of the LPATH parameter in the Digital Q.BPM services. If necessary, change the value to the correct one, or disable (delete) the parameter
- After setting the parameter, restart Digital Q.BPM services
Setting up authentication in Kafka via SSL (Secure Sockets Layer)
Description of parameters
KAFKA_SECURITY_PROTOCOL- the protocol that the service supports for the broker, the default is "PLAINTEXT" to enable SSL you must set it to "SSL".KAFKA_TRUSTSTORE_LOCATION- path to the trusted certificate store, according to The default is empty, the value must begin with the protocol instructions ”file://” after which the full path to the file is reached.KAFKA_TRUSTSTORE_PASSWORD- password for the trusted certificate store, empty by default.KAFKA_KEYSTORE_LOCATION- path to the private key store, by default empty, rules for handling KAFKA_TRUSTSTORE_LOCATION symbols.KAFKA_KEYSTORE_PASSWORD- password for the private key store, empty by default.KAFKA_KEY_PASSWORD- password for the private key, empty by default.
Parameters must be added to the service settings file on the stand and to the file that is loaded onto the stand when installing/updating the service (application.properties or application.yaml)
Interaction of Services with Keycloak authentication
To use VPM services in a Keycloak-enabled environment, follow these steps:
-
Set up a stand to work with keycloak
-
Install the latest versions of Digital Q.BPM services and platform services required for Digital Q.BPM operation
-
In Kubernetes, add parameters to the service configuration files:
Parameters -
Delete the parameter
AUTH_PROVIDER=digitalq -
In the system config map, add the parameter
KUBERNETES_LEGACY_MOD=true -
Enable the parameter
SECURITY_ENABLED=truein BPM services. -
Parameters for adding a technical user to the Digital Q.BPM Player:
KEYCLOAK_AUTH_URLKEYCLOAK_CLIENT_IDKEYCLOAK_CLIENT_SECRETKEYCLOAK_SCOPEKEYCLOAK_GRANT_TYPETECH_AUTH_SERVICE_NAME// authorization service nameTECH_USERNAME// technical user loginTECH_PASSWORD// technical user password
- After configuring, restart the services. Example of a configured stand (opens in a new tab)
Final Stage
After the settings have been completed, you need to run the stand re-creation assembly (RecreateNamespace), which was created for your namespace. The stand must rise.
Starting services
Recommended resource values for starting the service:
Check the settings in the Deployment of the service in the resources/limits section. Recommended limits for Digital Q.BPM services:
          resources:
            limits:
              cpu: '2'
              memory: 2Gi
Memory allocation pool options:
JAVA_XMS: 1g
JAVA_XMX: 2gJAVA_XMS- initial memory allocation pool for a Java Virtual MachineJAVA_XMX- allocation pool for a Java Virtual Machine
How much memory is allocated will be visible when the service starts. If you do not configure the JAVA_XMS and JAVA_XMX parameters, their default values are as follows:
JAVA_XMS: 64m
JAVA_XMX: 512m
You cannot set the JAVA_XMS and JAVA_XMX parameters above the limits in service deployment. In this case, the service will not start.
Common errors when starting services
The service restarts with the error Killed in the logs:
- Solution: Raise the limits on service deployment
The service restarts with a Java heap space error in the logs:
- Solution: Check the JAVA_XMS and JAVA_XMX settings as described above
Service does not start
Error creating bean with name 'springSecurityFilterChain' defined- Solution: The ALLOW_ALL_FOR_DEBUG and SECURITY_ENABLED parameters are set incorrectly.
For Digital Q.BPM services the following values are correct:
ALLOW_ALL_FOR_DEBUG: false
SECURITY_ENABLED: true
Pod ImagePullBackOff status:
Failed to pull image <image name:tag>: rpc error: code = NotFound desc = failed to pull and unpack image <image name:tag>: failed to resolve reference <image name:tag>: <image name:tag>: not foundSolution: Register the current image from the image registry
License:
Error creating bean with name 'LStart': Invocation of init method failed; nested exception is java.lang.Exception: Signature is invalidSolution: The LPATH parameter is set incorrectly. Check the value of the LPATH parameter. This error can also occur if the license file has an incorrect structure.
Error creating bean with name 'LStart': Invocation of init method failed; nested exception is java.lang.Exception: ExpiredSolution: The license has expired. The license needs to be updated.
Error creating bean with name 'LStart': Invocation of init method failed; nested exception is java.lang.Exception: Error reading fileSolution: The license.xml section on the stand is empty or has incorrect content. It is necessary to check its contents at the stand.
Parameter not found: ExpirationDateSolution: View license сonfiguration (opens in a new tab)
If the database flushing is not completed or the flushing is incorrect, an error will appear in the interface:
ResultSet; SQL [n/a]; nested exception is org.hibernate.exception.SQLGrammarException: could not extract ResultSetSolution: Check the database flush log. If necessary, re-flush. A successful flush is indicated by the presence of the message: The DB-manager worked SUCCESSFULLY
Digital Q.BPM Player does not start
The deployment contains definitions with same key '<key value>' (id attribute), this is not allowedSolution: Open a repository with a Digital Q.BPM Player. Check processes in the src/main/resources directory for duplicate keys. Remove duplicate keys. Rebuild Digital Q.BPM Player.
ENGINE-01011 Unable to deploy process definition <someProcess>: there is already a message event subscription for a message named <someTopicName>Solution: Check the Digital Q.BPM Player act_ru_event_subscr table in the DB for data with the topic from the log. The record with the problematic topic must be deleted from the DB.
ENGINE-09005 Could not parse BPMN processSolution: Review Digital Q.BPM Player logs, locate the error and the diagram containing the error. Validate the specific diagram in the editor and XML validator. Correct or delete the diagram. Commit the changes and rebuild Digital Q.BPM Player.
Authentication
Failed to instantiate [javax.servlet.Filter]: Factory method 'springSecurityFilterChain' threw exception; nested exception is org.springframework.beans.factory.BeanCreationException: Error creating bean with name 'mdpAuthJwtDecoder' defined in class path resource [ru/diasoft/micro/mdp/lib/qoauth/QSecurityConfig.class]Solution: Update mdpauth version, check authorization settings (opens in a new tab)
Kafka
Failed to create topics. error: Creating topics with default partitions/replication factor are only supported in CreateTopicRequest version 4+. The following topics need values for partitions and replicas: [qpbcd-pbc-ext-bussiness-platform-platform-type-reply]Solution: Add a parameter to the Config Maps service spring.cloud.stream.kafka.binder.replication-factor: '1'
Expiring 1 record(s) for <topic name>:120000 ms has passed since batch creationSolution: in the Kafka service parameters, set the setting min.insync.replicas = 1
Value for parameter replication.factor ≥ min.insync.replicas
Failed to create new KafkaAdminClientInvalid url in bootstrap.servers: qkafkaSolution: check the correctness of the KAFKA_HOST, KAFKA_PORT, KAFKA_URL settings on the stand